
Have you ever faced the challenge of removing spot welds but didn’t know where to start? Whether you’re working on a car repair, a metal project, or just trying to fix something around your home, removing spot welds can seem tricky.
But don’t worry—this guide will show you simple, effective steps to get the job done right. By the end, you’ll have the confidence and know-how to tackle spot weld removal safely and efficiently. Keep reading, and you’ll discover tips that make the process easier than you ever thought possible.
Tools Needed For Spot Weld Removal
Removing spot welds can be tricky without the right tools at your disposal. Having the proper equipment not only makes the job easier but also ensures you don’t damage the surrounding metal. Let’s look at the essential tools you’ll need for effective spot weld removal.
Basic Tools
Start with a solid foundation of basic tools. These are easy to find and often already in your toolbox.
- Angle Grinder:A versatile tool for grinding down welds and smoothing surfaces.
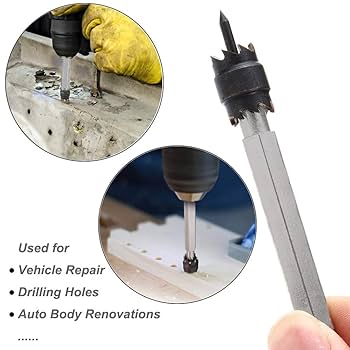
- Drill with Spot Weld Cutter Bits:Specifically designed to drill through spot welds without harming the metal underneath.
- Hammer and Chisel:Useful for gently prying apart welded panels once the weld is weakened.
- Safety Gear:Don’t skip gloves, safety glasses, and ear protection—they keep you safe during noisy and dusty work.
Without these basics, you’ll struggle to make any progress. Have you ever tried cutting welds with just a saw? It’s frustrating and slow.
Specialized Equipment
If you want to speed up the process and get cleaner results, specialized tools are a game-changer.
- Spot Weld Drill Bits or Weld Cutters:These bits are shaped to drill precisely into the weld, making removal faster and less damaging.
- Spot Weld Removal Pliers:Designed to twist and break welds apart after drilling, saving you from hammering and bending metal.
- Cutting Discs for Angle Grinders:Thin, durable discs help cut through welds without overheating or warping the metal.
- Air or Electric Spot Weld Cutters:For professionals or serious DIYers, these power tools make weld removal nearly effortless.
Investing in specialized equipment might seem costly at first, but it pays off in time saved and the quality of your work. What’s your experience with upgrading tools for a specific job? Did it change how you approach the task?

Credit: www.amazon.ca
Preparing The Work Area
Preparing the work area is crucial before removing spot welds. A clean, organized space ensures efficiency and safety. Taking time to set up properly reduces mistakes and accidents. This section covers essential steps for preparation.
Safety Precautions
Wear protective gear to guard against sparks and debris. Use safety glasses, gloves, and a long-sleeve shirt. Ensure proper ventilation to avoid inhaling fumes. Keep a fire extinguisher nearby in case of emergencies. Clear the area of flammable materials. Work in a well-lit environment for better visibility.
Cleaning And Marking
Clean the surface around the spot welds with a wire brush or sandpaper. Remove dirt, rust, and paint to see welds clearly. Mark the weld locations using a visible marker or chalk. Accurate marking helps guide your removal tools. Keep the markings simple and easy to follow. This step saves time and prevents damage to surrounding areas.
Drilling Out Spot Welds
Drilling out spot welds is a straightforward technique that lets you separate metal panels without causing damage. It’s a skill worth mastering, especially if you work on car repairs or metal fabrication. You’ll find that having the right tools and a clear process makes the job faster and cleaner.
Choosing The Right Drill Bit
Picking the correct drill bit is crucial. Spot welds are tough because they fuse two metal pieces together, so you need a bit that can handle steel without dulling quickly.
- Cobalt drill bitsare excellent for this task. They resist heat and stay sharp longer.
- High-speed steel (HSS) bitscan work but wear out faster on spot welds.
- Spot weld cutter bitsare designed specifically for this job and can make the process easier.
Make sure your drill bit is slightly smaller than the weld diameter. This helps you avoid drilling through the base metal and damaging the panel underneath.
Step-by-step Drilling Process
Start by securing the metal panels firmly. You don’t want them to move while drilling because it can cause uneven holes or damage.
Use a center punch to mark the exact spot weld location. This prevents the drill bit from slipping off when you begin drilling.
Set your drill to a medium speed. Too fast, and you risk overheating the bit; too slow, and the bit may not cut effectively.
- Begin drilling straight into the center of the spot weld with steady pressure.
- Pause occasionally to clear metal shavings from the hole and cool the bit.
- Once you feel the weld break, stop drilling to avoid going through the underlying metal.
After drilling, you can separate the panels with a gentle tap or pry tool. If some weld remains, repeat the process carefully on the remaining spots.
Have you ever tried drilling out spot welds only to damage the panel? What drill bits worked best for you? Share your experience to help others avoid common mistakes.
Using Spot Weld Cutters
Removing spot welds can be tricky without the right tools. Spot weld cutters are effective for this task. These cutters are designed to separate welded pieces without damaging the underlying material. They help maintain the integrity of the vehicle or structure. Using the correct technique ensures a clean removal process.
Types Of Cutters
Various spot weld cutters exist for different needs. Some common types are:
- Rotary Cutter:This type spins to cut through welds. It provides precision.
- Drill Bits:Special drill bits can cut through welds easily. They are versatile.
- Hole Saw Cutter:Creates a neat hole around the weld. Minimizes damage.
Choosing the right cutter depends on the material and the weld size. Rotary cutters work well on thin materials. Drill bits are good for thicker welds. Hole saw cutters are ideal for larger areas.
Proper Cutting Technique
Using spot weld cutters requires skill. Start by marking the weld area. This ensures accuracy. Align the cutter precisely over the weld. Apply steady pressure to avoid slipping.
Use moderate speed to cut through the weld. Fast speeds can damage the material. Once the cutter penetrates the weld, remove the top layer. Check the underlying metal for signs of damage.
Regularly check the cutter’s sharpness. A dull cutter can cause uneven cuts. Replace or sharpen the cutter as needed. This ensures smooth operation.
Practice safety by wearing protective gear. Use gloves and goggles for protection. Ensure a stable work surface to prevent accidents.
Grinding Techniques For Weld Removal
Grinding is a common technique to remove spot welds quickly and effectively. It uses an abrasive tool to wear down the weld material until it is flush with the metal surface. This method works well for many types of metal and allows for smooth finishing after removal. Proper grinding can save time and reduce damage to surrounding metal.
Choosing the right grinder and using proper grinding techniques are key to clean weld removal. The right tool helps control the process and prevents rough edges or burns. Following simple tips can make the job easier and safer, producing better results.
Selecting The Grinder
Pick a grinder that fits the size of the weld and the work area. Angle grinders are popular because they offer good control and power. Choose one with a comfortable handle and adjustable speed settings. Use grinding discs made for metal removal, such as:
- Flap discs for smooth finishing
- Cut-off wheels for quick weld removal
- Grinding wheels for heavy material removal
Make sure the grinder is in good condition and always wear safety gear like gloves and eye protection.
Grinding Tips For Clean Removal
- Hold the grinder firmly and move it steadily over the weld.
- Keep the grinding disc flat against the surface to avoid gouges.
- Use light pressure to prevent overheating the metal.
- Work in short bursts to check progress and avoid damage.
- Clean the area with a wire brush after grinding to remove debris.
Following these tips helps achieve a smooth finish ready for welding or painting. Grinding spot welds carefully ensures the metal stays strong and looks good.
Credit: www.chevelles.com
Separating Panels After Weld Removal
Separating panels after removing spot welds requires care and the right tools. The panels often stick together and need gentle prying. Using the correct approach helps avoid damage and keeps the panels reusable. This process ensures clean separation and prepares the surfaces for the next steps.
Using Pry Tools
Select pry tools that are thin and strong. Plastic or nylon pry tools reduce the risk of scratching. Metal pry bars work well but need careful handling.
- Insert the tool gently between panels at the weld area.
- Apply slow, steady pressure to create a gap.
- Work along the weld line, moving the tool gradually.
- Avoid forcing the panels apart quickly to prevent warping.
Using leverage carefully helps separate the panels without bending them.
Avoiding Panel Damage
Protect the panels by wearing gloves and working in a clean space. Avoid sharp tools that can gouge or scratch. Check the edges for hidden weld spots before prying.
- Use gentle tapping with a rubber mallet to loosen stuck areas.
- Keep the tool flat against the panel to spread pressure evenly.
- Do not pry near painted or coated sections to avoid chipping.
- Inspect panels often to catch any signs of stress or cracks.
Taking these steps reduces repair time and keeps panels in good shape.
Finishing Touches
After removing spot welds, the work isn’t quite finished yet. The surface often looks rough and uneven, which can affect both the strength and appearance of your project. Paying attention to these finishing touches can make a big difference, whether you’re planning to re-weld or paint over the area.
Smoothing The Surface
Start by cleaning up the metal around the spot weld removal area. Use a grinder or sanding tool to remove any leftover weld material and smooth out rough edges. Take your time here; a flat, even surface helps prevent weak points and makes your next steps easier.
If you notice any small pits or holes after grinding, fill them with metal filler or weld beads before sanding again. How smooth is smooth enough? Aim for a surface that feels consistent to the touch, with no sharp bumps or dips. This not only improves the look but also ensures better bonding if you’re rewelding.
Preparing For Rewelding Or Painting
Before you start rewelding, make sure the metal is clean and free from dust, oil, or rust. Wipe the area with a degreaser or use a wire brush to get rid of contaminants. A clean surface prevents weak welds and helps paint stick better if you’re painting.
If you’re painting, consider applying a primer designed for metal surfaces. This step seals the area and protects against rust, especially where the welds were removed. Have you checked your tools and materials lately? Using the right primer and paint can save you from costly touch-ups later.

Credit: www.amazon.ca
Common Mistakes To Avoid
Removing spot welds can be tricky, especially if you’re not aware of common pitfalls. Mistakes during this process can lead to wasted time, damaged materials, and extra repair work. Knowing what to avoid helps you maintain control and get the job done right the first time.
Overheating Metal
Overheating the metal is a frequent mistake that weakens the structure. Applying too much heat can cause warping or change the metal’s properties, making it brittle or soft in spots.
Use controlled, short bursts of heat instead of a long, steady application. If you’re using a grinder or drill, take breaks to let the metal cool down. Have you noticed how quickly metal can lose its strength after excessive heating?
Damaging Adjacent Areas
Spot welds are often close to other important parts. It’s easy to accidentally damage these areas if you’re not careful. Scratches, dents, or holes can turn a simple weld removal into a costly repair.
Protect nearby surfaces with clamps, shields, or tape. Work slowly and focus on precision rather than speed. Think about how much time you could save by avoiding unnecessary damage that requires patching or repainting.
Frequently Asked Questions
What Tools Are Needed To Remove Spot Welds Safely?
To remove spot welds safely, use a spot weld cutter, drill, or grinder. Protective gear like gloves and goggles is essential. Proper tools prevent damage and ensure efficient weld removal.
How Do You Remove Spot Welds Without Damaging Metal?
Use a spot weld cutter or drill carefully to avoid metal damage. Work slowly and apply steady pressure. Avoid overheating to maintain metal integrity during weld removal.
Can Spot Welds Be Removed Without Specialized Tools?
Removing spot welds without specialized tools is challenging and risky. Standard drills may work but can damage metal. Specialized cutters ensure clean and safe weld removal.
How Long Does It Take To Remove Spot Welds?
Removing spot welds usually takes a few minutes each. Time varies with weld size, tool type, and skill level. Proper tools speed up the process efficiently.
Conclusion
Removing spot welds takes patience and the right tools. Follow each step carefully to avoid damage. Use proper safety gear to protect yourself. Practice on scrap metal before working on important parts. Taking your time helps you get clean, smooth results.
With steady hands and focus, you can do it well. Keep your workspace organized and bright. Soon, you will handle spot weld removal with confidence.
About The Author

