
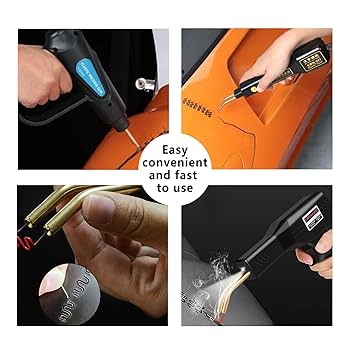
Are you tired of dealing with cracked plastic items that seem impossible to fix? Imagine having the power to repair those broken pieces quickly and confidently, saving money and frustration.
Learning how to use a plastic welder can turn you into a DIY hero, giving your damaged plastics a new life. In this guide, you’ll discover simple, step-by-step tips that anyone can follow—even if you’ve never tried plastic welding before.
Keep reading, and you’ll soon master a skill that makes fixing plastic not just doable, but downright satisfying.
Choosing The Right Plastic Welder
Choosing the right plastic welder is key to a successful project. The right tool fits your needs and the materials you work with. Understanding different types and what matters most helps you pick wisely.
Types Of Plastic Welders
Plastic welders come in various forms, each designed for specific tasks.
- Hot Air Welders:Use heated air to melt plastic surfaces for joining.
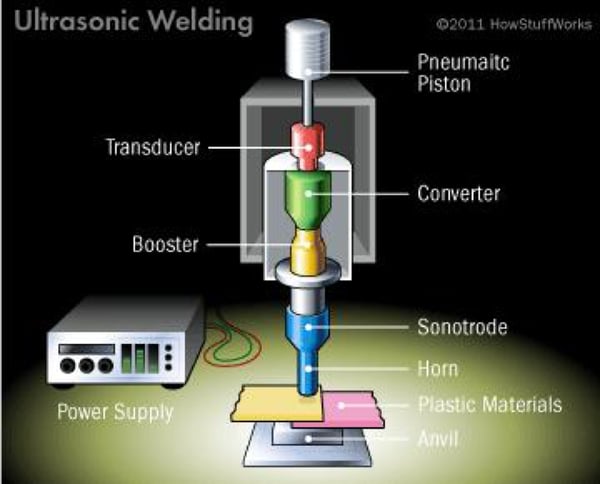
- Ultrasonic Welders:Use high-frequency vibrations to fuse plastic parts quickly.
- Extrusion Welders:Melt and deposit plastic filler material into joints.
- Butt Welders:Join plastic pieces by heating and pressing them together.
Each type suits different plastic types and project sizes.
Factors To Consider
Several factors affect your choice of plastic welder.
- Plastic Type:Some welders work better with specific plastics like PVC or ABS.
- Project Size:Small repairs need different tools than large fabrications.
- Power Source:Consider electric, battery, or pneumatic options based on your workspace.
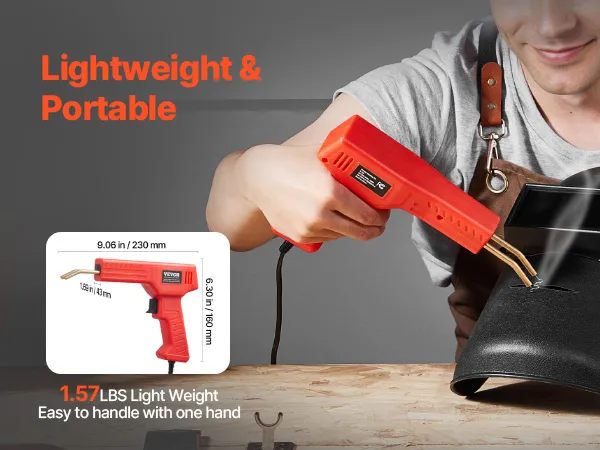
- Portability:Lightweight welders are easier to use in tight spaces.
- Temperature Control:Precise control helps avoid damaging plastics.
- Budget:Choose a welder that meets needs without overspending.
Preparing The Workspace
Preparing the workspace is the first key step before using a plastic welder. A clean and organized area helps you work safely and efficiently. This stage reduces accidents and improves the quality of your welding job. Focus on creating a space with good lighting and enough room to move around freely.
Safety Precautions
Safety comes first when working with a plastic welder. The tool heats up to very high temperatures and can cause burns. Always wear protective gloves and safety glasses to protect your hands and eyes.
Make sure your workspace is well ventilated. Welding plastic releases fumes that can be harmful if inhaled. Avoid working in small, closed spaces without fresh air.
Keep a fire extinguisher nearby. Sparks or hot plastic can ignite nearby flammable materials. Clear the area of any clutter or loose papers that could catch fire.
Gathering Essential Tools
Collecting the right tools before starting saves time. Besides the plastic welder, you need a few basic items.
- Plastic welding rods matching the material you will repair
- A clean, flat work surface made of metal or heat-resistant material
- Clamps to hold pieces in place during welding
- A wire brush or sandpaper to clean and roughen the plastic surfaces
- A utility knife or scissors for trimming excess plastic
- A heat-resistant mat to protect your workbench
Arrange all tools within easy reach. This setup helps maintain focus and speed during the welding process.
Identifying Plastic Types
Knowing the type of plastic you’re working with is crucial before you start welding. Different plastics respond differently to heat and adhesives. Identifying the right plastic ensures a strong, lasting bond and prevents damage to your material or tool.
Common Plastic Materials
Plastics come in many varieties, but some are more common in welding projects:
- Polyethylene (PE):Often used in containers, pipes, and plastic bags. It’s flexible and tough.
- Polypropylene (PP):Found in automotive parts and household goods. It has good chemical resistance.
- Polyvinyl Chloride (PVC):Used in pipes, window frames, and flooring. It’s rigid and durable.
- Acrylonitrile Butadiene Styrene (ABS):Popular in toys, electronics, and automotive components. Known for impact resistance.
- Polystyrene (PS):Common in disposable cutlery and packaging. It’s brittle and not often welded.
Have you noticed the recycling codes on plastic items? They can give quick hints about the type of plastic you’re dealing with.
Testing For Plastic Compatibility
Before welding, test if your plastic pieces will bond well together. Start with a small scrap piece to avoid ruining your main project.
- Heat Test:Apply the plastic welder’s heat to a scrap and observe how it melts. Does it become stringy and fuse well, or does it burn or crack?
- Flex Test:After welding, flex the joint gently. Does it hold firm or crack easily?
- Visual Inspection:Check if the weld line is smooth and continuous without bubbles or gaps.
Sometimes, plastics that look similar won’t bond properly. Have you ever spent time welding only to find the joint weak? Testing saves you that frustration.
Cleaning And Prepping Surfaces
Cleaning and prepping surfaces is a crucial step before you start using a plastic welder. If the surfaces are dirty or oily, the weld won’t hold properly, and you might end up with a weak or uneven bond. Taking the time to prepare your materials carefully makes your work stronger and more professional.
Importance Of Clean Surfaces
Have you ever tried to stick a sticker on a dusty window? It just doesn’t stick well, right? The same idea applies to plastic welding. Any dirt, grease, or residue on the plastic can block the heat and filler material from bonding correctly.
Even small amounts of dust or oil can cause bubbles or cracks in the weld. Clean surfaces ensure the plastic melts and fuses smoothly, giving you a strong, lasting repair. It’s easy to skip this step, but it’s the difference between a quick fix and a durable solution.
Methods For Effective Cleaning
Start by wiping the surface with a clean cloth to remove loose dust and dirt. Next, use isopropyl alcohol or a plastic-safe cleaner to remove grease and oils. Avoid harsh chemicals that might damage the plastic or leave a sticky residue.
If the plastic has paint or stubborn grime, gently sand the area with fine-grit sandpaper to create a smooth, clean surface. After sanding, wipe the area again with alcohol to clear away dust.
- Use a lint-free cloth to avoid leaving fibers on the surface.
- Work in a well-ventilated area to let solvents evaporate quickly.
- Dry the surface completely before starting the welding process.
Have you noticed how much smoother your welds become when you take these simple cleaning steps? It’s a small effort that pays off with stronger and cleaner results every time.
Mastering Welding Techniques
Mastering welding techniques is essential for anyone looking to work effectively with a plastic welder. Understanding the right approach helps you create strong, clean joints that last. Whether you’re fixing a cracked bumper or crafting custom parts, your skill level shapes the final result.
Basic Welding Methods
Start by getting comfortable with the heat welding method. This involves heating the plastic edges until they soften, then pressing them together. It’s simple, but controlling the temperature and pressure is key to avoid weak joints or melting the parts too much.
Another straightforward technique is extrusion welding. Here, you feed a plastic rod into the weld area as it heats, which fills gaps and strengthens the bond. This method works well on uneven surfaces or larger cracks that need extra support.
Keep your workspace clean and use steady, even movements. If your weld looks bubbly or cracked, adjust your heat settings or speed. What’s your experience with controlling temperature—have you ever overheated the plastic by accident?
Advanced Welding Strategies
Once you’re confident with basics, try hot air welding for more precise control. Using a hot air gun, you can direct heat exactly where it’s needed, allowing delicate or intricate welds. This technique shines when working on thin plastics or complex shapes.
Another advanced strategy is solvent welding, which uses a chemical to soften the plastic surfaces before joining. This creates a nearly seamless bond because the plastic actually fuses together. It demands careful handling of solvents and perfect surface preparation.
Consider combining methods for tougher jobs. For example, start with solvent welding, then reinforce the joint with extrusion welding for added strength. Have you ever mixed techniques to solve a tricky repair? Share your approach.

Credit: www.amazon.com
Handling Common Repair Challenges
Handling common repair challenges with a plastic welder requires a steady hand and a clear approach. You’ll often face issues like cracks, holes, or material distortion. Understanding how to tackle these problems can save you time and improve the quality of your repairs.
Dealing With Cracks And Holes
Cracks and holes are the most frequent issues you’ll encounter. Begin by cleaning the damaged area thoroughly; dirt and grease can weaken the weld. Use a plastic scraper or sandpaper to smooth the edges around the crack or hole, creating a better surface for welding.
For larger holes, consider adding a plastic patch. Secure it on the backside before welding to strengthen the repair. When filling cracks, run your welder’s tip steadily along the break, melting the plastic evenly without rushing.
Have you noticed that applying too much heat can make the crack bigger? Control the temperature carefully. Practice on scrap plastic first to get a feel for the right heat and speed.
Preventing Warping And Distortion
Warping happens when plastic gets too hot and loses its shape. To avoid this, use short welding passes instead of one long continuous one. Let the plastic cool briefly between passes to maintain its form.
Work in a well-ventilated area to help plastic cool faster and reduce fumes. You might also clamp the piece to a flat surface to keep it steady. This simple trick helps prevent bending or twisting during the repair.
Ask yourself: Are you applying pressure evenly while welding? Uneven pressure can cause uneven melting and warping. Keep your hand steady and consistent to produce smooth, strong welds every time.
Finishing Touches
Finishing touches are vital after welding plastic parts. These steps improve appearance and strength. Proper finishing ensures the weld looks clean and lasts longer. Neglecting this phase can cause weak spots or rough surfaces. Focus on smoothing and reinforcing the weld for best results.
Smoothing Welds
Use a fine-grit sandpaper to smooth the weld area. Sand gently to avoid damaging the plastic. This removes excess weld material and sharp edges. A smooth surface looks neat and helps paint or glue stick better. Clean the area with a damp cloth to remove dust after sanding.
Ensuring Durability
Check the weld for any cracks or gaps. Apply a plastic adhesive or filler to weak spots for extra strength. Let the repair dry completely before handling. Heat the weld slightly with the plastic welder to fuse it better if needed. Strong finishing steps make the weld last longer under stress.
Credit: www.nexpcb.com
Maintenance Of Welding Tools
Maintaining your plastic welder is essential to keep it performing well and to extend its lifespan. Neglecting simple upkeep can lead to poor weld quality and unexpected tool failures. Paying attention to maintenance not only saves money but also ensures your projects stay on track without frustrating delays.
Regular Cleaning
After every use, make sure to clean your plastic welder thoroughly. Residue and melted plastic can build up on the nozzle and heating elements, which reduces efficiency and can cause uneven heating. Use a soft brush or cloth to remove debris, and avoid harsh chemicals that might damage the tool’s surface.
Check the air vents regularly to ensure they are free from dust and plastic particles. Blocked vents can cause overheating, which shortens the welder’s life. Taking just a few minutes for cleaning can prevent costly repairs later.
Tool Storage Tips
How you store your plastic welder affects its readiness and longevity. Always let the tool cool down completely before putting it away to avoid damage to storage cases or surrounding items. Consider using a dedicated case or toolbox to keep it safe from dust and accidental knocks.
Store your welder in a dry, cool place away from direct sunlight and moisture. Excessive heat or dampness can corrode internal parts and degrade electronic components. Have you noticed how a small investment in proper storage can save you from major headaches?
Credit: www.vevor.com
Frequently Asked Questions
What Materials Can A Plastic Welder Join Effectively?
A plastic welder works best on thermoplastics like PVC, ABS, and polypropylene. It melts the plastic edges, creating a strong bond as they cool.
How Do I Prepare Surfaces Before Plastic Welding?
Clean surfaces thoroughly to remove dirt and grease. Sand the edges lightly for better adhesion and ensure they fit snugly before welding.
What Safety Precautions Should I Take When Using A Plastic Welder?
Wear protective gloves and eyewear. Work in a well-ventilated area to avoid inhaling fumes. Keep flammable materials away from the welding zone.
How Long Does It Take To Cool After Plastic Welding?
Cooling time varies by plastic type, typically between 1 to 5 minutes. Avoid moving the joint during this period for a strong bond.
Conclusion
Using a plastic welder takes practice but is simple to learn. Start with clean surfaces and steady hands for best results. Always wear safety gear to protect yourself. Take your time and work carefully on each joint. With patience, your repairs will be strong and last long.
Keep your tools clean and store them properly after use. Small fixes can save money and extend plastic items’ life. Now, you can confidently try plastic welding on your own projects.
About The Author

