
If your car bumper has a crack or break, you don’t have to rush to the repair shop or buy a new one. You can fix it yourself by learning how to weld plastic car bumper parts.
Imagine saving money and getting your bumper looking strong and smooth again—all with some simple tools and easy steps. In this guide, you’ll discover exactly how to weld your plastic bumper like a pro, even if you’ve never done it before.
Ready to bring your bumper back to life? Keep reading, and you’ll find out how.
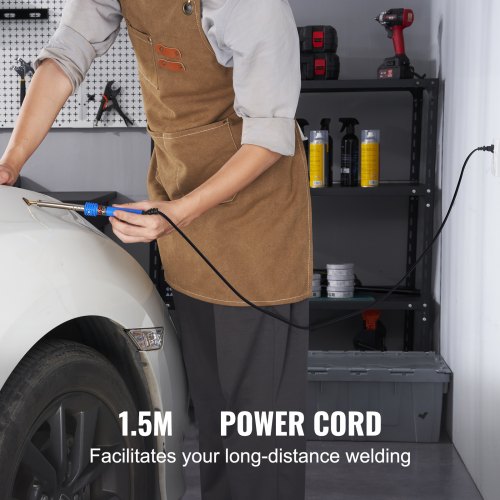
Credit: www.vevor.ca
Tools And Materials Needed
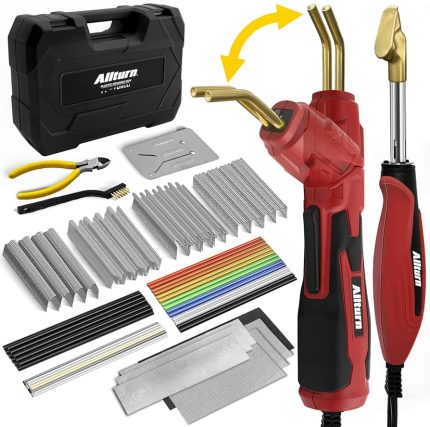
Welding a plastic car bumper needs specific tools and materials. Each tool plays a role in making the repair strong and smooth. Having the right materials ensures the bumper holds well after the fix.
Choosing quality tools saves time and improves the repair result. The materials should match the type of plastic in the bumper. This helps the weld bond properly and last longer.
Plastic Welding Machine
A plastic welding machine is essential. It heats the plastic to melt and join pieces. Choose one with adjustable temperature for different plastic types. This tool gives control over the welding process.
Plastic Filler Rods
Filler rods add material to the weld joint. Use rods made of the same plastic type as the bumper. They fill gaps and strengthen the repair area.
Cleaning Supplies
Clean the bumper before welding. Use isopropyl alcohol or a plastic cleaner. Dirt and grease stop the weld from sticking well.
Sandpaper
Sandpaper smooths the damaged area and removes old paint. Use fine grit, around 180 to 220. It helps the weld stick and creates a neat finish.
Clamps Or Clips
Clamps hold the bumper pieces tightly during welding. They keep parts in place and prevent gaps. This ensures a strong bond as the plastic cools.
Protective Gear
Wear gloves and safety glasses to protect from heat and fumes. Ventilate the workspace to avoid inhaling plastic smoke. Safety is important in every welding job.

Credit: www.amazon.ca
Preparing The Bumper
Preparing your plastic car bumper correctly is key to a strong, lasting weld. If you skip or rush this part, the repair might not hold up. Take your time to clean and inspect the bumper thoroughly before you start welding.
Cleaning The Surface
Any dirt, grease, or old paint can stop the welding material from bonding properly. Use a plastic-safe cleaner or isopropyl alcohol to wipe down the entire area around the crack or break.
Make sure you remove all residues, including wax or road grime. A clean surface looks dull and matte, not shiny or oily. If you skip this, the weld may weaken or fail quickly.
Assessing Damage
Look closely at the bumper to understand the extent of the damage. Is it just a small crack, or are there missing chunks of plastic? Knowing this helps you decide whether welding alone will fix it or if you’ll need filler material too.
Check for any internal damage behind the bumper that might affect how you weld. Sometimes, what looks like a simple crack can be a sign of a bigger problem. Have you ever started a repair only to find the damage was worse than expected?
Choosing The Right Welding Technique
Choosing the right welding technique is crucial for fixing a plastic car bumper properly. Different plastics need different methods to bond strongly. The right technique ensures durability and a clean finish.
Consider the type of plastic, the size of the damage, and the tools available. Some methods work better for small cracks, while others suit larger breaks. Understanding each technique helps you pick the best one for your repair.
Hot Air Welding
Hot air welding uses a stream of hot air to melt plastic surfaces. The melted parts fuse together as they cool down. This method works well for polyethylene and polypropylene bumpers.
A hot air welder tool is needed to control the heat and airflow. It provides a strong and flexible bond. The process is fast and allows precise control on small areas.
- Heats plastic evenly
- Creates strong, lasting bonds
- Good for large and small repairs
- Requires special welding rods matching the plastic
Chemical Welding
Chemical welding uses solvents to soften plastic surfaces. The softened edges then stick together as the solvent evaporates. This method suits ABS and PVC bumpers well.
This technique needs careful application of solvent glue or adhesive. It fills gaps and bonds plastics without heat. It’s ideal for small cracks and precise repairs.
- Uses liquid solvents or adhesives
- No heat needed, reducing burn risk
- Works best on clean, dry surfaces
- Requires curing time for full strength
Welding Process
The welding process for plastic car bumpers demands precision and care. Each stage ensures the repair holds strong and looks seamless. Understanding how to align, heat, and fuse the plastic correctly can make a huge difference in the final result.
Aligning The Pieces
Start by cleaning the damaged edges thoroughly. Any dirt or grease can weaken the bond. Hold the bumper pieces tightly together, making sure they fit perfectly without gaps.
Use clamps or tape to keep the parts steady. If the pieces shift during welding, the repair won’t be strong. Imagine trying to glue two puzzle pieces that don’t quite meet—that’s why alignment matters.
Applying Heat
Heat is the key to melting plastic just enough to fuse it. Use a plastic welding gun or a soldering iron designed for plastic work. Too much heat can burn the plastic, while too little won’t create a solid joint.
Move the heat source slowly along the joint to soften the edges evenly. This prevents warping or holes. Do you feel confident controlling the temperature, or do you tend to rush? Patience here pays off.
Using Plastic Rods
Plastic rods act as filler material to strengthen the weld. Choose rods that match the bumper’s plastic type, like polypropylene or ABS. This ensures the repair blends in and holds up well.
Feed the rod into the heated joint, letting it melt and bond with the bumper. Smooth the surface with the welding tool to remove bumps. This step gives your bumper repair a professional finish that lasts.
Finishing Touches
Finishing touches are what transform a welded plastic car bumper from a rough repair to a seamless restoration. This stage demands patience and precision to ensure the repair blends perfectly with the rest of your car. Skipping these steps risks leaving visible flaws that can reduce the overall appearance and durability of your work.
Sanding And Smoothing
Start by sanding the welded area with medium-grit sandpaper to remove excess material and level the surface. Move to finer grit sandpaper to smooth out scratches and create an even texture that matches the surrounding bumper.
Use circular motions and apply gentle pressure to avoid gouging the plastic. If you notice any uneven spots, repeat sanding until the surface feels consistently smooth to the touch. Have you tried wet sanding? It helps reduce dust and offers a cleaner finish.
Painting And Polishing
Before painting, clean the surface thoroughly to remove dust and oils that could prevent paint adhesion. Choose a paint that matches your car’s color and is compatible with plastic surfaces.
Apply multiple thin coats rather than one thick layer to avoid drips and uneven coverage. After the paint dries completely, polish the area with a fine polishing compound to restore shine and blend the repair with the rest of the bumper.
Polishing also helps protect the paint and adds a professional touch. Have you noticed how small details like these elevate the entire repair? Taking your time here pays off in a flawless finish.

Credit: www.amazon.ca
Safety Precautions
Safety is the top priority when welding plastic car bumpers. The process involves heat, fumes, and sharp tools. Protecting yourself reduces the risk of injury and ensures a smooth job. Follow these safety steps closely before starting to weld.
Wear Protective Gear
Always wear gloves to protect your hands from hot surfaces. Use safety goggles to shield your eyes from sparks and debris. A mask or respirator helps avoid inhaling harmful fumes from melted plastic.
Work In A Well-ventilated Area
Welding plastic releases toxic fumes. Make sure to work outdoors or in a room with strong airflow. Use fans or open windows to keep fresh air moving. Avoid breathing in the smoke to protect your lungs.
Use Proper Tools And Equipment
Choose tools designed for plastic welding. Check that your welding gun and attachments are in good condition. Faulty equipment can cause accidents or poor welds. Follow the manufacturer’s instructions carefully.
Keep Fire Safety Measures Ready
Heat sources can ignite nearby materials. Keep a fire extinguisher close to your workspace. Remove flammable items like paper and cloth from the area. Be ready to act fast if a fire starts.
Maintain A Clean Workspace
Clear the work area of clutter and spills. A tidy space prevents slips and falls. Organize your tools for easy access. Clean surfaces help create strong, even welds.
Common Mistakes To Avoid
Welding a plastic car bumper can be rewarding, but it’s easy to make mistakes that weaken the repair or damage the material further. Avoiding common errors will save you time, money, and frustration. Let’s look at some pitfalls that often catch even experienced DIYers off guard.
Not Preparing The Surface Properly
Skipping thorough cleaning before welding is a huge mistake. Dirt, grease, and old paint prevent the weld from bonding well. You should sand the area lightly and wipe it down with isopropyl alcohol to ensure a clean surface.
Have you ever noticed a repaired bumper cracking again? It often starts with poor preparation.
Using The Wrong Welding Temperature
Plastic melts at different temperatures depending on the type. Applying too much heat can burn or deform the bumper, while too little heat results in a weak joint. Adjust your welder’s temperature based on the plastic type—usually, polypropylene or ABS requires specific settings.
Pay attention to how the plastic reacts under heat; it tells you if the temperature is right.
Ignoring Proper Alignment Of Parts
Misaligned bumper parts create stress points that cause cracks later. Clamping the pieces securely before and during welding keeps everything in place. Don’t rush this step—accuracy here improves the strength and appearance of the repair.
Can you imagine driving with a bumper that looks uneven or loose? Alignment matters more than you might think.
Using Incompatible Filler Material
Not all plastic welding rods match the bumper material. Using the wrong filler weakens the bond and may cause discoloration. Identify the plastic type first, then buy a compatible filler rod designed for that specific plastic.
Choosing a filler is not just about color—it’s about chemical compatibility.
Overlooking Ventilation And Safety
Plastic welding releases fumes that can be harmful if inhaled. Working in a poorly ventilated area risks your health and might also affect the weld quality. Always weld in a well-ventilated space and wear protective gear like a mask and gloves.
Have you ever felt dizzy or nauseous during or after welding? That’s a sign to improve your safety measures.
Tips For Long-lasting Repairs
Making repairs on a plastic car bumper last long requires care and attention. Small mistakes can cause weak spots. Following key tips helps create strong, durable welds. This section shares practical advice to keep your bumper repair solid and lasting.
Clean The Surface Thoroughly
Remove all dirt, grease, and old paint from the repair area. Use a plastic-safe cleaner for best results. Clean surfaces ensure better adhesion of the welding material. Avoid touching the cleaned area with bare hands afterward.
Use The Right Welding Temperature
Set your welding tool to the correct temperature for the plastic type. Too hot can melt the bumper, too cold can cause weak joints. Follow the plastic manufacturer’s temperature guide or test on a scrap piece first.
Apply Even Pressure During Welding
Press the welding tool evenly on the plastic surface. Avoid pushing too hard or too lightly. Consistent pressure helps the plastic bond well without gaps or bubbles. Move the tool steadily along the repair line for uniform heat.
Reinforce The Repair Area
Add a plastic mesh or patch behind the weld for extra strength. This support reduces stress on the repaired section. Use a compatible plastic material to avoid weak spots. Secure the patch well before welding.
Allow Proper Cooling Time
Do not rush after welding. Let the bumper cool naturally at room temperature. Quick cooling with water or air can cause cracks. Cooling time helps the weld set firmly for a lasting fix.
Finish With Sanding And Painting
Sand the repaired area smoothly after it cools. Use fine-grit sandpaper to blend the weld with the bumper surface. Paint the repair with plastic-friendly paint to protect it from weather and UV damage.
Frequently Asked Questions
How Do You Prepare A Plastic Bumper For Welding?
Clean the bumper thoroughly to remove dirt and grease. Sand the welding area lightly to create a rough surface. This helps the welding material adhere better and ensures a strong bond.
What Tools Are Needed To Weld A Plastic Car Bumper?
You need a plastic welding kit, including a heat gun or welding machine, plastic filler rods, and a sanding tool. Safety gear like gloves and goggles is also essential for protection during welding.
Can All Plastic Bumpers Be Welded?
Most plastic bumpers made of polypropylene or polyethylene can be welded. However, some materials like ABS may require specific welding techniques. Always check the bumper’s plastic type before starting.
How Long Does It Take To Weld A Plastic Bumper?
Welding a plastic bumper typically takes 30 to 60 minutes. This depends on the damage size and your welding skill. Proper curing time after welding is also important for durability.
Conclusion
Welding a plastic car bumper takes patience and the right tools. Follow each step carefully for a strong repair. Practice helps improve your technique and confidence. Keep safety in mind to avoid any accidents. A well-welded bumper saves money and keeps your car looking good.
Try the process slowly, and don’t rush the job. With time, you can fix small damages yourself. This skill adds value and convenience to car care.
About The Author

