
Are you ready to power your home or outdoor space with solar energy but unsure how to connect multiple panels? Wiring two solar panels together might seem tricky at first, but it’s easier than you think.
Getting this right can boost your system’s efficiency and save you money on electricity. In this guide, you’ll learn simple, step-by-step instructions that anyone can follow—no technical jargon or confusing terms. By the end, you’ll feel confident setting up your solar panels like a pro.
Let’s dive in and make your solar setup work perfectly for you!
Credit: www.ebay.com
Types Of Solar Panel Connections
Connecting two solar panels can be done in different ways. The type of connection affects the system’s voltage, current, and overall performance. Choosing the right connection depends on your energy needs and the system setup.
Two common methods are series wiring and parallel wiring. Each has unique characteristics that impact how the solar panels work together.
Series Wiring Basics
In series wiring, the positive terminal of one panel connects to the negative terminal of the next. This setup adds the voltage of each panel together. The current remains the same as one panel’s current.
For example, two 12-volt panels wired in series create a 24-volt output. This method is useful when you need higher voltage for your system.
Parallel Wiring Basics
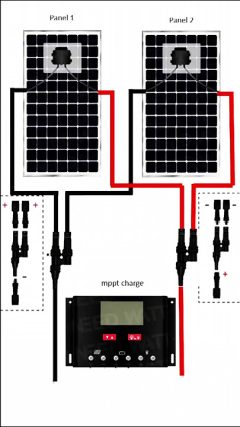
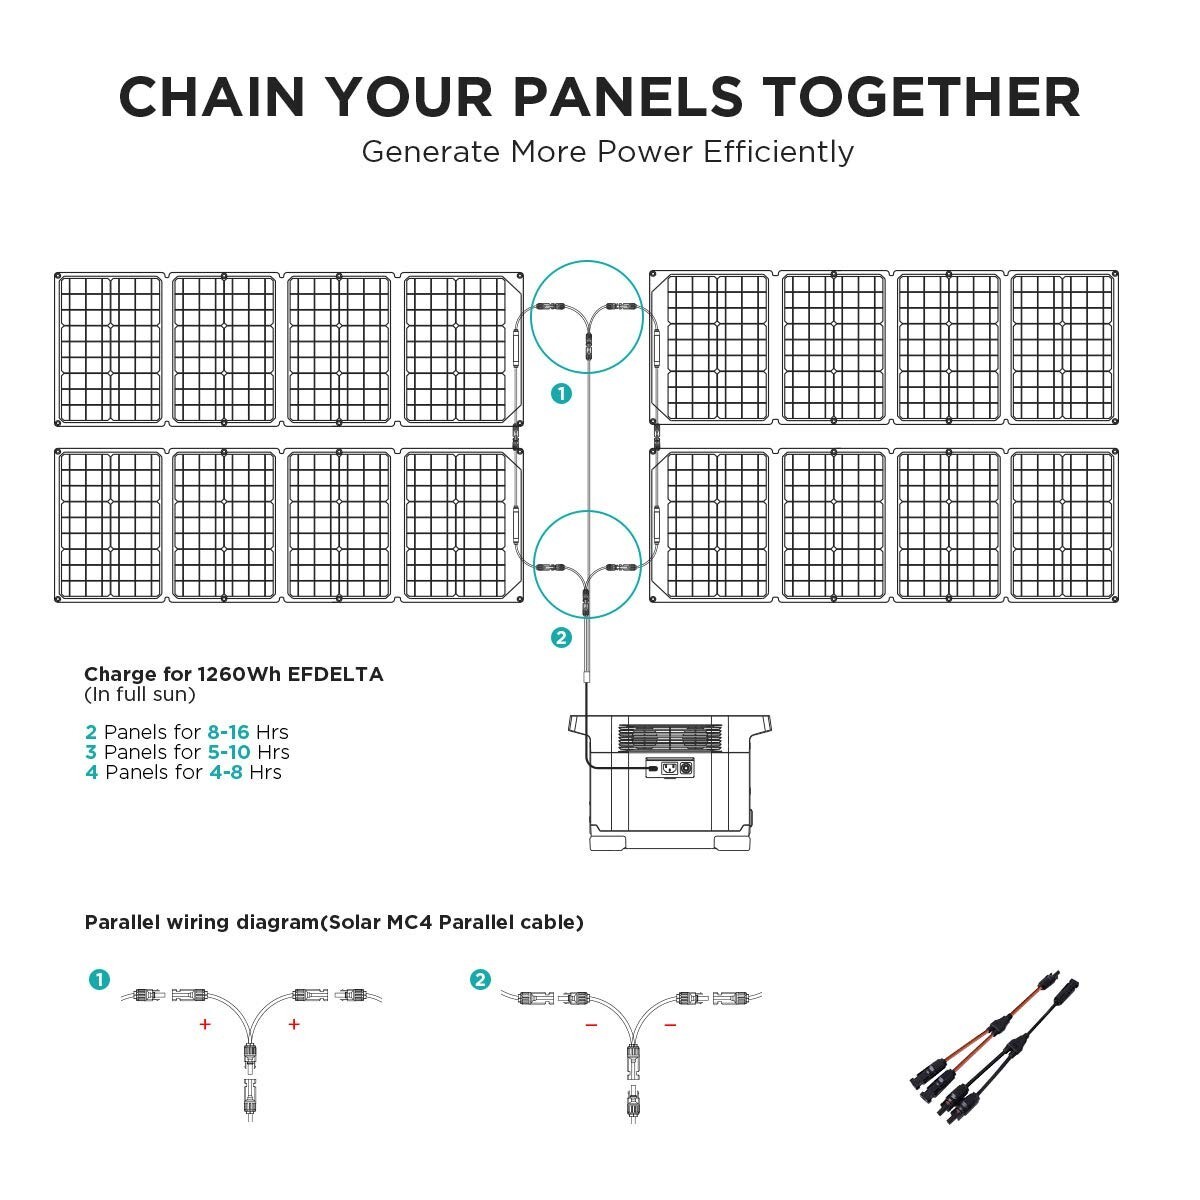
Parallel wiring connects all positive terminals together and all negative terminals together. The voltage stays the same as one panel’s voltage.
The current adds up, which increases the total current output. For instance, two 12-volt panels wired in parallel will still produce 12 volts but double the current.
Pros And Cons Of Each Method
| Wiring Type | Advantages | Disadvantages |
|---|---|---|
| Series |
|
|
| Parallel |
|
|
Tools And Materials Needed
Gathering the right tools and materials makes wiring two solar panels easier and safer. Proper equipment ensures clean connections and reliable power output. This section lists everything needed to complete the wiring task confidently.
Essential Wiring Tools
- Wire cutters and strippers for clean cable ends
- Crimping tool for secure connector attachment
- Multimeter to check voltage and continuity
- Screwdrivers for terminal connections
- Heat gun or electrical tape for insulation
- Measuring tape to cut wires to correct length
Solar Panel Components
- Two solar panels compatible in voltage and current
- MC4 connectors for easy and weatherproof connections
- Appropriate gauge solar wire for carrying current
- Combiner box for connecting panels in parallel (optional)
- Charge controller to regulate battery charging
- Battery or inverter for energy storage and use
Safety Gear
- Insulated gloves to prevent electric shock
- Safety glasses to protect eyes from sparks or debris
- Non-conductive footwear for secure footing
- Fire extinguisher nearby for emergencies
- Clear workspace free from clutter and moisture
Preparing Your Solar Panels
Preparing your solar panels properly ensures safe and efficient wiring. This stage helps avoid future problems and maximizes panel output. Take time to check each panel carefully before connecting them together.
Inspecting Panels For Damage
Look over each solar panel closely. Check for cracks on the glass surface. See if the frame is bent or broken. Make sure the wiring and connectors are intact. Damaged panels can reduce power and cause safety risks. Replace any panel with visible damage.
Checking Voltage And Current Ratings
Find the voltage and current ratings on each panel’s label. Both panels should have the same voltage rating for easy wiring. Different current ratings can cause imbalance in the system. Note the maximum voltage (Vmp) and current (Imp) values. Matching these ratings helps the panels work well together and prevents damage.
Wiring Solar Panels In Series
Wiring solar panels in series increases the total voltage output while keeping the current the same. This setup is useful for charging batteries or powering devices that need higher voltage. Connecting panels in series is simple and effective for many solar projects.
Connecting Positive To Negative
Start by taking the positive terminal of the first solar panel. Connect it to the negative terminal of the second panel. This link creates a chain that adds the voltage of both panels. Use proper wires rated for solar use. Make sure the connections are tight to avoid power loss.
Securing The Connections
Use wire connectors or MC4 connectors designed for solar panels. These ensure a secure and weatherproof connection. Wrap connections with electrical tape for extra safety. Check that no wires are exposed to prevent short circuits. Proper securing improves durability and safety of your system.
Testing The Series Setup
Use a multimeter to measure the total voltage across the series connection. The voltage should be the sum of both panels’ voltages. Check for any drops or loose connections. Testing helps confirm that the wiring is correct and the system works as expected.
Wiring Solar Panels In Parallel
Wiring solar panels in parallel is a smart choice if you want to keep the voltage the same while increasing the total current output. This setup is especially useful when your system requires a specific voltage but you want more power capacity. It’s straightforward but requires careful attention to ensure safety and efficiency.
Connecting Positives Together
Start by identifying the positive terminals on each solar panel. Use a wire to connect these positive terminals together. Make sure the connection is secure and insulated to prevent any accidental shorts.
Using connectors like MC4 can make this process easier and safer. If you’ve ever struggled with loose connections, you know how important a tight fit is in maintaining consistent power flow. Double-check the polarity to avoid damaging your system.
Connecting Negatives Together
Next, connect the negative terminals of the solar panels in the same way you did with the positives. Join the negative terminals together using a suitable wire and ensure all connections are firm.
It’s easy to overlook the negative side, but this step is just as crucial. If your negative connections are loose, your system might not function efficiently or could even become hazardous. Keep the wiring neat to simplify troubleshooting later.
Testing The Parallel Setup
Before hooking up your panels to the charge controller or battery, test the parallel wiring with a multimeter. Check the voltage across the positive and negative terminals—it should match the voltage of a single panel.
Also, measure the current output by simulating sunlight or working in daylight. Are you getting the expected combined current? If not, revisit your connections to make sure everything is wired correctly.
Testing helps you catch mistakes early and prevents damage to your equipment. What did you discover about your wiring the first time you tested it? Each setup can teach valuable lessons for future projects.

Credit: hqsolarpower.com
Common Wiring Mistakes To Avoid
Wiring two solar panels together might seem straightforward, but small mistakes can cause big problems. Avoiding common wiring errors ensures your system runs efficiently and lasts longer. Let’s look at some typical wiring mistakes that you can easily prevent.
Mismatched Panel Specifications
Using solar panels with different voltages or amperages can cause imbalance in your system. This mismatch might reduce the overall power output or even damage the panels. Always check the specifications before wiring panels together to ensure they match.
Imagine connecting a 12V panel with a 24V panel—your system won’t function properly, and you risk overheating components. Matching panels in series or parallel requires consistent voltage and current ratings. Don’t assume panels are compatible just because they look similar.
Loose Or Corroded Connections
Loose wires or corroded terminals create resistance, which reduces the power flow from your panels. Over time, this can lead to overheating or permanent damage to your wiring. Always double-check your connections and tighten them securely.
It’s easy to overlook the small screws or clamps, but they are critical for safe operation. If your system is outdoors, exposure to moisture can cause corrosion—regular inspections help catch this early. Have you checked your connections recently?
Ignoring Polarity
Connecting the positive and negative wires incorrectly can cause short circuits or damage your solar panels and charge controller. Polarity matters—always identify and connect the positive (+) and negative (-) terminals correctly.
Mark the wires clearly before wiring to avoid confusion. Using a multimeter to test polarity before finalizing connections adds an extra layer of safety. What steps do you take to ensure your polarity is correct?
Safety Tips During Installation
Safety should be your top priority while wiring solar panels together. The process involves working with electricity and delicate equipment, so taking the right precautions protects both you and your investment. Let’s focus on practical safety tips that make your installation smoother and risk-free.
Working With Electricity Safely
Electricity can be dangerous if not handled properly. Always turn off all power sources before starting your work. Use insulated tools to avoid accidental shocks.
Wear rubber-soled shoes and avoid working in wet conditions to reduce the risk of electrical accidents. Double-check all connections for tightness and correct polarity before powering up the panels.
Do you have a voltage tester? It’s a simple tool that can confirm no current is flowing before you touch any wires. Using one can prevent surprises that cause injury or damage.
Handling Solar Panels Carefully
Solar panels are fragile and expensive. Handle them by the edges to avoid cracking the glass surface or damaging the cells underneath.
Never place panels face down on rough surfaces. Lay them on soft, clean materials during installation to keep them scratch-free.
Have you noticed how a small scratch can reduce a panel’s efficiency? Protecting your panels from physical damage helps maintain their performance and lifespan.
Working slowly and methodically reduces the chance of dropping or bumping panels. It’s better to spend a few extra minutes than to risk costly repairs.

Credit: www.reddit.com
Maintaining Your Solar Panel Connections
Maintaining your solar panel connections is essential for long-lasting performance. Proper care helps avoid power loss and potential damage. Regular checks and cleaning keep the system efficient and safe.
Regular Inspection
Inspect your solar panel connections at least once every few months. Look for signs of wear, corrosion, or loose wires. Check for any damage caused by weather or pests. Early detection of issues prevents bigger problems later.
Cleaning And Tightening Connections
Keep your connections clean from dust, dirt, and debris. Use a soft cloth or brush to wipe the terminals gently. Avoid harsh chemicals that could damage the wires or panels. Tighten all screws and connectors to ensure a secure fit. Loose connections can cause sparks or reduce efficiency.
Frequently Asked Questions
How Do I Wire Two Solar Panels In Series?
To wire two solar panels in series, connect the positive terminal of one panel to the negative terminal of the other. This increases voltage while keeping current the same, ideal for higher voltage system setups like grid-tied inverters.
What Is The Difference Between Series And Parallel Wiring?
Series wiring increases voltage by connecting positive to negative terminals. Parallel wiring connects positives together and negatives together, increasing current while keeping voltage constant. Choose based on your system’s voltage and current requirements.
Can I Mix Solar Panels With Different Wattages?
Mixing solar panels with different wattages is possible but not ideal. It can reduce overall efficiency and complicate wiring. For best performance, use panels with similar voltage and current ratings.
What Tools Are Needed To Wire Two Solar Panels Together?
You need wire strippers, crimping tools, connectors, and multimeter. These tools ensure safe and proper connections when wiring solar panels in series or parallel configurations.
Conclusion
Wiring two solar panels together can boost your energy output. You can connect them in series or parallel, depending on your needs. Each method changes voltage or current in different ways. Always check the panel specifications before starting. Use proper tools and safety gear to avoid accidents.
Taking time to plan helps prevent mistakes. This simple setup can power small devices or charge batteries. Keep learning and experimenting with solar projects. Solar energy offers a clean, affordable way to power your home.
About The Author

