
Are you ready to take control of your energy and save money with solar power? Wiring multiple solar panels might sound tricky, but with the right steps, you can do it yourself and boost your system’s efficiency.
In this guide, you’ll discover simple, clear instructions that make connecting your solar panels easy and safe. Whether you’re powering your home or a small project, understanding how to wire your panels correctly is key to getting the most from your investment.
Keep reading, and you’ll soon feel confident handling your solar setup like a pro.

Credit: powmr.com
Choosing Solar Panels
Choosing the right solar panels is a crucial step before wiring multiple panels together. Your decision affects the system’s efficiency, compatibility, and overall performance. Think about your energy needs and space availability as you consider the options.
Types Of Solar Panels
There are mainly three types of solar panels: monocrystalline, polycrystalline, and thin-film.
- Monocrystalline panelsare efficient and take up less space, but they cost more.
- Polycrystalline panelsare more affordable but slightly less efficient.
- Thin-film panelsare lightweight and flexible, ideal for unique surfaces, but they require more space and have lower efficiency.
Choosing between these depends on your budget, roof space, and power goals. What matters most to you—cost savings or maximum output?
Panel Compatibility
Not all solar panels play well together. When wiring multiple panels, matching voltage and current ratings is vital to prevent system issues.
Using panels from the same brand and model simplifies wiring and maximizes efficiency. Mixing different types can cause uneven power flow and reduce lifespan.
Ask yourself if you want a straightforward setup or are ready to handle the complexities of mixed panels.
Sizing Your System
Calculate your daily energy use to size your solar panel system correctly. Oversizing wastes money; undersizing limits your power supply.
Consider how many panels fit on your roof and their wattage ratings. For example, if your daily use is 30 kWh and each panel produces 300 watts, you’ll need around 10 panels.
Think about future needs too—will you add more panels later? Planning ahead saves rewiring headaches.
Wiring Configurations
Wiring multiple solar panels correctly is key for a strong solar power system. The way panels connect affects voltage, current, and overall output. Choosing the right wiring configuration matches your system needs and battery or inverter specs.
Different wiring setups suit different goals. Some increase voltage, others boost current. Sometimes a mix of both is best. Understanding each wiring style helps you build a system that works well and lasts long.
Series Wiring Basics
Series wiring links solar panels end to end. The positive terminal of one panel connects to the negative of the next. This setup adds the voltage of each panel together.
- Voltage increases with each panel added.
- Current stays the same as one panel.
- Good for systems needing higher voltage.
Watch out for shading. If one panel is shaded, it affects the whole string. Series wiring suits panels with the same rating.
Parallel Wiring Basics
Parallel wiring connects all positive terminals together and all negatives together. This keeps voltage the same but adds the current of each panel.
- Voltage remains constant at panel voltage.
- Current increases with each panel added.
- Works well for low-voltage systems needing more current.
Shading on one panel reduces only its output. Panels can have different orientations or ratings.
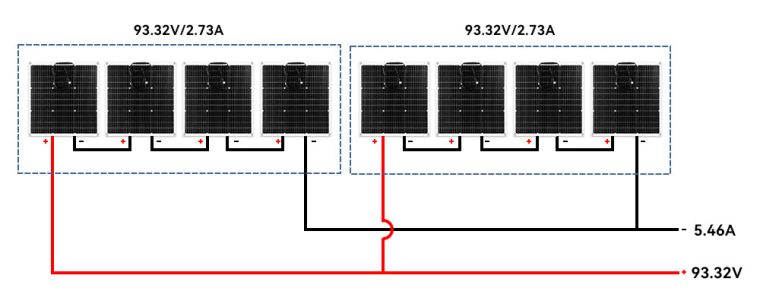
Combining Series And Parallel
Combining series and parallel wiring balances voltage and current. Panels are grouped in series strings, then those strings connect in parallel.
- Adjust voltage by changing string length.
- Adjust current by changing number of strings.
- Flexible for larger, complex systems.
This setup improves system reliability and matches battery or inverter requirements better. It also reduces losses and helps with shading issues.
Required Tools And Materials
Wiring multiple solar panels requires specific tools and materials to ensure a safe and efficient setup. Preparing the right equipment makes the installation smoother and avoids common mistakes. Understanding what you need helps you stay organized and ready for the task.
Essential Tools
- Wire stripper and cutter for clean cable ends
- Multimeter to check voltage and continuity
- Crimping tool for secure wire connections
- Screwdriver set for mounting hardware
- Drill for making holes in mounting surfaces
- Wrench or socket set to tighten bolts
- Measuring tape for accurate cable length
Wiring Components
- Solar cables rated for outdoor use
- MC4 connectors for panel connections
- Combiner box to join multiple panel outputs
- Fuses or circuit breakers for system protection
- Charge controller to regulate battery charging
- Battery bank (if off-grid system)
- Inverter to convert DC to AC power
Safety Gear
- Insulated gloves to prevent electric shock
- Safety goggles to protect eyes from debris
- Non-slip shoes for secure footing on roofs
- Helmet to protect your head during installation
- First aid kit for emergency situations
Preparing The Installation Site
Preparing the installation site is essential for a successful solar panel setup. This stage ensures your panels work efficiently and last long. Proper planning here saves time and prevents future problems.
Panel Placement
Choose a location with maximum sunlight exposure. Avoid areas shaded by trees, buildings, or other obstructions. Panels should face south in the northern hemisphere for best sun capture.
Check the angle of the roof or ground where panels will sit. The tilt affects energy production. Adjust the angle to match your latitude for optimal results.
Mounting Structures
Select sturdy mounting structures that fit your site. Roof mounts are common but ground mounts offer flexibility in positioning. Ensure the structure can support the weight of all panels.
Use corrosion-resistant materials like aluminum or stainless steel. Secure mounts firmly to prevent movement during strong winds or storms.
Weatherproofing Considerations
Seal all openings where wires pass through walls or roofs. Use weatherproof gaskets and sealants to keep moisture out. Moisture can damage panels and wiring.
Protect wiring with conduit or cable trays. This prevents damage from sun exposure, animals, and physical impact. Check local codes for weatherproofing requirements.
Step-by-step Wiring Process
Wiring multiple solar panels requires careful planning and precise connections. The process involves linking panels to increase voltage, current, or both. Proper wiring ensures optimal power output and system safety. Follow these steps to connect your solar panels correctly.
Connecting Panels In Series
Series wiring links the positive terminal of one panel to the negative terminal of the next. This setup increases the total voltage while keeping the current constant. It is useful for systems that need higher voltage.
- Identify the positive and negative terminals on each panel.
- Connect the positive terminal of the first panel to the negative terminal of the second panel.
- Repeat the connection for all panels in the series.
- Leave the free negative terminal on the first panel and the free positive terminal on the last panel for system connection.
Connecting Panels In Parallel
Parallel wiring connects all positive terminals together and all negative terminals together. This method increases the total current while keeping the voltage the same. It suits systems that need higher current.
- Gather all positive terminals from each panel and connect them together.
- Do the same for all negative terminals.
- Use branch connectors or combiner boxes for neat and safe connections.
- Ensure wire sizes match the total current of the system.
Securing Connections
Secure connections prevent power loss and protect against weather damage. Use proper tools and materials to maintain safety and efficiency.
- Tighten all terminal screws firmly without over-tightening.
- Use waterproof connectors or sealant to protect connections from moisture.
- Organize wires with cable ties or clips to avoid tangling.
- Inspect all connections regularly for corrosion or wear.
Testing And Troubleshooting
Testing and troubleshooting your solar panel wiring is essential to ensure the system runs efficiently and safely. Skipping this step can lead to poor performance or even damage to your equipment. Let’s look at how you can check the voltage and current, spot common problems, and keep your setup secure.
Voltage And Current Checks
Use a multimeter to measure the voltage across each panel and the current flowing through the wires. These readings help confirm your panels are producing power as expected. If you notice a lower voltage or current than the panel’s rating, it could signal wiring errors or shading issues.
Check the voltage at the panel terminals first, then at the battery or inverter input. Differences between these points may mean there’s resistance or a loose connection somewhere. Have you compared your readings against the manufacturer’s specs? This simple step can save hours of guesswork.
Identifying Common Issues
Look for loose connections, corrosion on terminals, and damaged cables. These are frequent culprits of power loss and system failure. Sometimes, a single faulty panel can drag down the entire array’s performance.
Watch for inconsistent voltage readings between panels wired in series or parallel. An unexpected drop could indicate a damaged cell or poor wiring. Ask yourself: is every panel performing equally, or is one causing trouble?
- Loose or corroded connectors
- Incorrect wiring configuration
- Damaged solar cells or panels
- Faulty charge controller or inverter
Ensuring System Safety
Always disconnect the system before working on wiring to avoid electric shocks. Use insulated tools and wear protective gear when testing or fixing connections. Don’t forget to check fuses and breakers to protect your system from overloads.
Ground your panels properly to prevent electrical faults and reduce the risk of fire. Is your setup compliant with local electrical codes? Ensuring safety isn’t just about protecting equipment—it’s about keeping you and your property safe.
Maintaining Solar Panel Systems
Maintaining your solar panel system is key to ensuring it runs efficiently and lasts for years. Regular care keeps your panels producing maximum energy and can help you spot issues before they become costly problems. Let’s look at some practical ways to keep your solar setup in top shape.
Regular Inspections
Check your solar panels visually at least once a month. Look for cracks, loose wiring, or shading from new tree growth. Small issues like a broken panel or disconnected wire can seriously reduce your system’s output if left unchecked.
Also, inspect the mounting hardware and wiring connections for corrosion or wear. If you spot anything unusual, contact a professional to fix it promptly. Catching problems early saves you money and headaches later.
Cleaning Panels
Dust, bird droppings, and leaves can cover your panels and block sunlight. Cleaning them every few months helps maintain their efficiency. Use a soft brush or cloth and water—avoid harsh chemicals that can damage the surface.
If you live in a dry or dusty area, you might need to clean more often. Rain helps, but it’s not enough to remove stubborn grime. Have you noticed a drop in performance after a long dry spell? That could mean your panels need a good wash.
Monitoring Performance
Keep track of your system’s energy output daily or weekly. Many solar setups come with monitoring apps or displays to help you see how well your panels are doing. Sudden drops in energy production can signal shading, dirt, or technical issues.
Compare your system’s current output to past data to spot trends. If your panels aren’t producing as much as before, it’s time to investigate. Monitoring helps you stay proactive rather than reactive, saving time and money.

Credit: www.renogy.com

Credit: www.edn.com
Frequently Asked Questions
How Do You Connect Multiple Solar Panels Together?
You can wire solar panels in series, parallel, or a combination of both. Series wiring increases voltage, while parallel wiring increases current. Choose based on your system’s voltage and current requirements to maximize efficiency and match your inverter or charge controller specifications.
What Tools Are Needed To Wire Solar Panels Safely?
Essential tools include wire cutters, strippers, a multimeter, crimping tools, and proper connectors. Safety gear like gloves and eye protection is important. These tools ensure secure connections and help test voltage and current during installation for optimal performance.
Can I Mix Different Solar Panel Brands When Wiring?
Mixing brands is possible but not recommended. Different panels may have varying voltage, current ratings, and efficiencies. This can reduce overall system performance and complicate wiring. Using panels with matching specifications ensures a balanced and efficient solar power setup.
What Wiring Method Is Best For Multiple Solar Panels?
The best wiring method depends on your system’s design. Series wiring is ideal for higher voltage systems, while parallel suits higher current needs. Combining both can optimize output. Always consider your inverter and charge controller limits to prevent damage.
Conclusion
Wiring multiple solar panels takes care and attention. Choose the right wiring method for your system size. Series wiring raises voltage, while parallel wiring boosts current. Always check panel specifications before connecting them. Use proper connectors and safety gear during installation.
Test the system after wiring to ensure it works well. Good wiring helps your solar panels last longer. This saves energy and lowers electricity bills. Take your time and follow these steps carefully. Your solar setup will provide clean energy for years.
About The Author

