
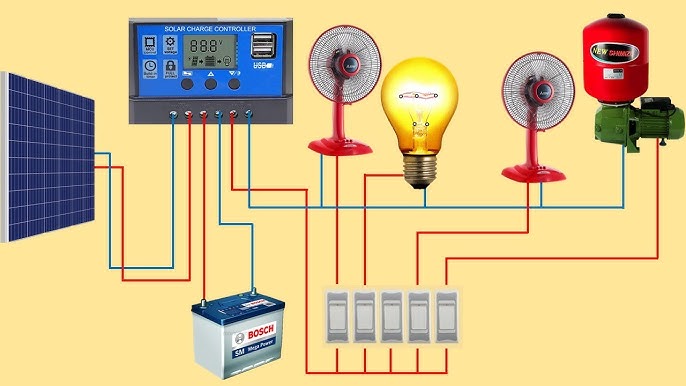
Wiring your solar panel might seem tricky at first, but with the right steps, you can do it yourself and save money. Imagine powering your home or gadgets with clean, free energy from the sun.
You don’t need to be an expert to make this happen. In this guide, you’ll discover simple, clear instructions that will help you connect your solar panels safely and effectively. Keep reading, and you’ll learn how to take control of your energy needs—starting right now.

Credit: shopsolarkits.com
Types Of Solar Panels
Choosing the right type of solar panel is key to wiring your solar system effectively. Each type has unique features that affect how you connect and optimize your setup. Understanding these differences helps you pick the best fit for your energy needs and budget.
Monocrystalline Panels
Monocrystalline panels are made from a single crystal structure. This design gives them a sleek black appearance and high efficiency, often above 20%. Because they produce more power per square foot, you might need fewer panels, simplifying your wiring layout.
These panels perform well in limited space and low-light conditions. However, they usually cost more upfront. Have you considered whether your roof space or budget matters more when wiring your system?
Polycrystalline Panels
Polycrystalline panels contain multiple silicon crystals, resulting in a blue, speckled look. They tend to be less efficient, around 15-17%, but are more affordable. This cost-effectiveness allows you to install more panels if wiring space and budget permit.
Because of their lower efficiency, wiring might involve more panels connected in series or parallel to meet your energy goals. Think about whether you prefer fewer panels or lower cost when planning your wiring design.
Thin-film Panels
Thin-film panels use layers of photovoltaic material on a flexible base. They are lightweight and can be installed on unconventional surfaces, but efficiency is lower, typically 10-12%. Wiring these panels often requires different connectors and considerations due to their size and flexibility.
They handle shading better and can be easier to wire in irregular shapes. Would you prioritize installation flexibility over maximum power output when choosing this type?

Credit: www.grankia.com
Essential Tools And Materials
Gathering the right tools and materials is the first step to successfully wiring your solar panel. Without proper equipment, you risk poor connections and safety hazards. Ensuring you have everything ready before starting saves time and prevents frustration.
Wiring Components
Wiring components form the backbone of your solar panel setup. You will need:
- Solar cables:Use cables rated for outdoor use and sunlight exposure, typically 10 or 12 gauge.
- Connectors:MC4 connectors are standard for solar panels, providing secure and weatherproof connections.
- Fuse or circuit breaker:Protect your system from electrical overloads by installing a fuse or breaker in the wiring.
- Charge controller:This regulates the voltage and current coming from your solar panels to the battery.
- Battery cables:Heavy gauge cables to connect your charge controller to the battery bank.
Have you checked if your cables are compatible with your panel’s voltage and current ratings? Using mismatched wiring can cause energy loss or even damage.
Safety Equipment
Safety should always come first when working with electricity. Equip yourself with:
- Insulated gloves:Protect your hands from shocks and cuts while handling wires.
- Safety goggles:Shield your eyes from sparks or debris during connections.
- Multimeter:Useful not just for testing but also for ensuring wires are de-energized before handling.
- Non-conductive tools:Use screwdrivers and pliers with insulated handles to avoid accidental electric shocks.
Have you ever underestimated the importance of safety gear? It’s better to be cautious and avoid costly injuries.
Testing Devices
Testing devices help verify your wiring is correct and your system functions efficiently. Essential devices include:
- Multimeter:Measures voltage, current, and resistance to ensure proper circuit operation.
- Solar power meter:Specifically designed to measure the output of your solar panel in real-time.
- Continuity tester:Quickly checks for breaks or shorts in your wiring.
Are you confident your setup is wired correctly? Using these devices prevents hidden faults and maximizes your solar power harvest.
Planning Your Solar Wiring
Planning your solar wiring is essential for a safe and efficient system. It helps avoid electrical issues and loss of power. Careful planning ensures your solar panels work well with your home setup. This stage involves understanding power needs, wire sizes, and how to connect panels.
Calculating Power Needs
Begin by figuring out how much power you use daily. Add the watts of all devices you want to run on solar power. Multiply the total watts by the hours you use them each day. This gives the total watt-hours needed. Knowing your power needs helps pick the right solar panels and battery size.
Choosing Wire Gauge
Wire gauge affects how much electricity flows safely through the wires. Thicker wires carry more current and reduce power loss. Use a wire gauge chart to match your system’s voltage and current. Choose wires that can handle a bit more current than your system needs. This keeps your system safe and efficient.
Deciding Wiring Configuration
Solar panels can connect in series, parallel, or a mix. Series wiring increases voltage by adding panel voltages. Parallel wiring increases current by adding panel currents. Choose series for higher voltage and lower current systems. Choose parallel for higher current and lower voltage systems. Mixing both helps match your inverter and battery setup.
Connecting Solar Panels
Connecting solar panels correctly is key for a strong and efficient solar power system. The wiring setup affects voltage, current, and overall energy output. Choosing the right connection type depends on your power needs and panel specifications.
Each wiring method has benefits and suits different situations. Understanding these methods helps you build a safe and effective solar array.
Series Wiring Steps
- Identify the positive terminal of the first panel.
- Connect this positive terminal to the negative terminal of the next panel.
- Continue linking panels in this way until all are connected.
- Leave one positive and one negative terminal free on the ends.
- Connect these free terminals to your charge controller or inverter.
- This setup increases voltage while current stays the same.
Parallel Wiring Steps
- Connect all positive terminals of panels together.
- Connect all negative terminals together as well.
- Use thick cables to handle higher current safely.
- Attach the combined positive and negative wires to your system.
- This wiring keeps voltage the same but increases current.
- Ideal for systems needing more current at lower voltage.
Combining Series And Parallel
This method mixes series and parallel wiring for balanced voltage and current.
- Group panels in series to reach desired voltage.
- Connect these series groups in parallel to boost current.
- Check panel voltage and current ratings before combining.
- Use proper connectors and ensure tight, clean connections.
- Test the system voltage and current after wiring.
- Combining wiring allows flexible system design for various needs.
Installing Charge Controller And Inverter
Installing a charge controller and inverter is a crucial part of wiring your solar panel system. These components manage the energy flow and convert solar power into usable electricity for your home. Getting this setup right ensures your system runs efficiently and safely.
Charge Controller Wiring
The charge controller acts as the middleman between your solar panels and the battery. It prevents overcharging and protects the battery’s lifespan. Connect the solar panels to the charge controller’s solar input terminals first.
Next, wire the battery terminals to the charge controller’s battery output. Make sure to match the positive and negative terminals correctly to avoid damage. Use cables that can handle the current from your solar panels for safety and performance.
Double-check all connections before powering on. Have you ever overlooked a simple wiring step only to find out it caused system issues later? Taking time now can save headaches later.
Inverter Connections
The inverter changes the DC electricity stored in your batteries into AC power that your appliances use. Connect the inverter’s input terminals to the battery bank, again observing correct polarity. Use thick, short cables to reduce power loss and heat buildup.
Then, connect your home’s electrical system to the inverter’s output. This step often involves working with your circuit breaker box, so if you’re unsure, consult a professional. Remember, the inverter should be installed in a dry, ventilated area to prevent overheating.
Grounding And Safety
Proper grounding is essential to protect you and your equipment from electrical faults. Connect all metal parts of your solar system, including panels, charge controller, inverter, and batteries, to a common grounding rod.
Use grounding wires of appropriate gauge and ensure connections are tight and corrosion-free. Installing a fuse or circuit breaker between the battery and inverter adds an extra layer of safety. Have you checked your local electrical codes to meet all safety regulations?

Credit: www.reddit.com
Testing The Solar System
Testing the solar system is a vital step after wiring your solar panels. It confirms the system works safely and efficiently. This step helps identify faults early and ensures your setup captures sunlight properly. Proper testing protects your investment and avoids future problems.
Checking Voltage And Current
Use a multimeter to measure voltage across the solar panel terminals. The reading should match the panel’s rated voltage under sunlight. Next, check the current output by setting the multimeter to the ampere mode. Compare values to the manufacturer’s specifications. Consistent readings indicate the system is operating well.
Test each panel individually and then the entire array. This process helps spot weak or faulty panels. Always perform tests in direct sunlight for accurate results. Record your measurements for future reference and troubleshooting.
Troubleshooting Common Issues
Low voltage or current can signal wiring problems or damaged panels. Check all connections to ensure they are tight and free of corrosion. Look for broken wires or loose terminals. Inspect panels for cracks or dirt that block sunlight.
If readings are unstable, test the charge controller and inverter. Faulty components may reduce system performance. Reset or replace defective parts as needed. Regular maintenance keeps your solar system running smoothly.
Frequently Asked Questions
How Do You Wire A Solar Panel To A Battery?
Connect the solar panel’s positive and negative wires to the charge controller. Then, link the controller to the battery terminals. This setup ensures safe charging and prevents battery damage. Always follow polarity to avoid short circuits.
What Tools Are Needed To Wire Solar Panels?
You need wire cutters, strippers, a multimeter, screwdrivers, and connectors. Proper tools ensure clean cuts and secure connections. Using the right tools prevents wiring errors and enhances system safety.
Can You Wire Solar Panels In Series Or Parallel?
Yes, wiring in series increases voltage, while parallel wiring increases current. Choose based on your system’s voltage and current requirements. Correct wiring maximizes power output and efficiency.
How To Choose The Right Wire Size For Solar Panels?
Select wire size based on current, distance, and voltage drop. Thicker wires reduce energy loss and improve safety. Use wire gauge charts to determine the best size for your system.
Conclusion
Wiring a solar panel is a simple task with clear steps. Follow safety rules and check all connections twice. Use the right tools to avoid mistakes or damage. Proper wiring helps your solar system work well and last longer. Take your time and stay careful during the process.
Soon, you will enjoy clean energy from the sun. Solar power can save money and help the planet. Start your solar wiring with confidence and care.
About The Author

